+44(0)28 9032 2228


-
 14/4/2025
CLASSROOM & ONLINE Power BI Level 1 course -
 31/3/2025
Microsoft 365 training courses in Word, Excel, Access, Outlook, Powerpoint, Sharepoint in Belfast and Omagh Northern Ireland -
 3/3/2025
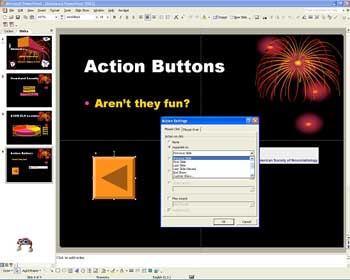
Need to Produce and Deliver Professional Presentations? Book NOW on our Advanced Microsoft PowerPoint course Training in Belfast Northern Ireland OR On your Own Premises - Limited places available -
 3/3/2025
Power BI Paginated Report Builder -
 6/5/2025
Intro to Crystal Reports Training from Belfast Northern Ireland - Virtual, Online - Learn how to create powerful and dynamic reports, presenting your data in an attractive format -
 3/3/2025
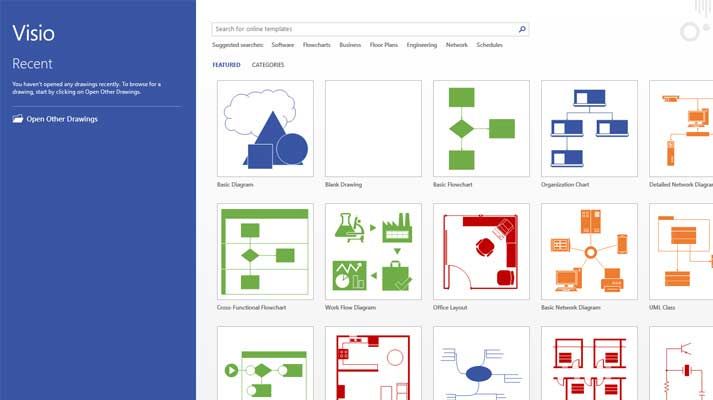
HOT COURSE - Intro to Microsoft Visio Training in Belfast Northern Ireland OR Virtually - CALL NOW to secure a place on this course -
 3/3/2025
Microsoft 365 Training Courses now available inc Belfast, Omagh, Derry, Newry and Throughout Northern Ireland -
 3/3/2025
CITB - The Construction Industry Training Board have included Mullan Training on their Approved List We deliver Trainings in Belfast Northern Ireland OR On Customer's Own Premises -
 3/3/2025
Data Visualisation & Presentation Techniques with Mullan IT Training -
 25/3/2025
Introduction to Microsoft Project Training from Belfast Northern Ireland - Classroom Based Training & Via Our Online Classrooms -
 3/3/2025
IT/Computer Room Hire in Belfast City Centre (Opposite Europa Hotel) - Call now to book -
 17/4/2025
HOT COURSE - Introduction to Microsoft Excel Training in Belfast Northern Ireland OR On your Own Premises - Call NOW to Book -
 14/4/2025
New Course - Microsoft Power BI Introduction training from Belfast Northern Ireland - Classroom & Online Training -
 26/3/2025
Microsoft Sharepoint Introduction Training Course in Belfast NI -
30/4/2025
Microsoft Visio Training from Belfast Northern Ireland - Maximise the potential of the Visio application -
 3/3/2025
Hot Course - 2 Day Advanced Microsoft Excel Course Training - CALL NOW TO BOOK -
 3/3/2025
Intro to Microsoft PowerPoint Training from Belfast Northern Ireland - Online Training Course -
 20/3/2025
1 day Adv Microsoft Excel CourseTraining in Belfast Northern Ireland OR On your Own Premises - Places Available - Call Now to Book
Tips & Tricks - (Excel, Word, Project, etc)
Mullan Training will be providing regular Tips and Tricks to help enhance your use of Microsoft Excel, Word and other applications.
Keep up to date with these tips by liking our Facebook page!
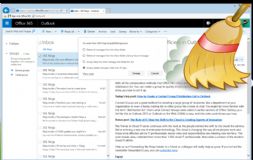
The Pilgrims Would Approve: Three Things to Do Before You Leave For Christmas
The holidays have arrived. As we're all preparing to head out for Christmas and check out for a little bit, there's always a list of to-dos in the office before shutting down. To make sure everything is taken care of in your work life, we want to help you make sure your break away from the office is stress free and that you feel refreshed and invigorated for your return to the office.
Sharing [your calendar] is Caring
Before you leave the office, make sure to share your travel plans with the people who matter. In Outlook, you are able to share your calendar both internally and externally. Letting your team know your travel plans can be helpful to alert them of when you will be near a computer, or are out of the office and unable to check email frequently. In Outlook, you are also able to share with external parties, such as customers or colleagues that work in different organizations. You are able to customize your sharing settings too, depending on how much others need to know.
.png)
Setting Up Great Expectations
Alerting the people that matter the most of your calendar is taking care of your most important contacts. However, setting an away message can let other people know of your whereabouts and availability. It's funny how timing works sometimes and the response you've been waiting on arrives when you're away. Luckily, setting up an away message can buy you some time on returning an important email and set the expectation of when you are able to reply.
Win the Turkey Race by Scheduling Emails
Deadlines tend to often hover around inconvenient times. To make sure you're fired up and ready to go, schedule an email to stay ahead of the game. Need to followup on a few items the day you get back from Christmas? Schedule an email today to make sure your ducks are in a row with an upcoming project and that come Monday, you'll have no problem making your deadline.
![]()
How to Share Large Files in Office 365 Using OneDrive for Business
If you're trying to share a video, program, or other large file, you've probably encountered the dreaded error when trying to send via Outlook: "This file is too large to send as an attachment."
Even if your admin has allowed for you to send large attachments, sometimes Outlook can't handle it. Luckily, Office 365 can come to the rescue!
The basic solution to this issue is to save your file to OneDrive for Business and share with your intended recipient directly from there. ODfB can handle it, which makes sharing large files a breeze.
Follow the instructions listed below:
- Upload your file to OneDrive for Business.
- Select the Share icon from the top bar, or right-click and select Share.
- Enter the recipient's name in the Invite people field, select your desired editing permissions and sign in requirement, and enter an option message if you're sending an email invitation. Alternatively, you can generate a sharing link and send it via the platform of your choice.
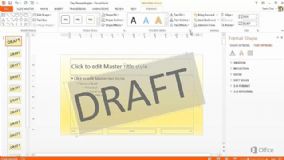
How to Add a Watermark to a PowerPoint Presentation
Some of the most confidential data is presented in a PowerPoint deck and one method to imply that there is confidential data is to add a watermark to the slides. Oftentimes, we need reminders that a document is "Internal Only," a "Draft," or "Not for Distribution," and adding a watermark is a helpful alert your audience.
First, we will begin by adjusting the slide master:
- Click the Viewtab.
- Select Slide master.
- Select the top slide.
- Go to the Inserttab.
- Add a text box in middle of the slide.
- Type in text you want to be watermarked.
- Resize, rotate, and adjust the text as you see fit.
- Now to make the text look faded and more like a watermark, select the Formattab
- Click the pop out menu for Format Shape. A menu will appear on the right.
- Click the Text options icon in the format shape menu.
- Under Text Fill and Outline,you can adjust the transparency of the text here.
- Adjust the text transparency as you see fit.
- Close the master view in the top menu bar.
- Now, the watermark should be visible on text heavy slides.
5 Tips to Customize Your Word Application & Make Life Easier
Many of us get used to using Microsoft Word "out of the box," without taking the time to alter the settings to accommodate our preferences. Whether you use Word to write simple paragraphs or perform complex mail merges, the customization tips in the list below can help make your experience with Word better.
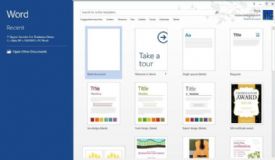
1. Disable the start screen of Word 2013.
One of the changes that longtime Office users noticed with Office 2013 is the addition of the start screen to the applications like Word. The screen displays a variety of templates and a list of your recently opened documents, which can come in handy, but it seems that many of us would rather bypass this start screen altogether and open directly to a new, blank document.
2. Customize the Quick Access Toolbar.
You'll see the Quick Access Toolbar above the Ribbon (by default) on Office 2013 programs like Word. It's the home for one-click icons for your favorite or most often used commands and actions. Customizing this toolbar is one of the best ways to save time by creating shortcuts to your frequently-used commands in Word 2013.
3. Turn off paragraph marks and formatting symbols.
Word will detect when you start a numbered or bulleted list and helpfully automate it, so that when you press Enter, new list items are automatically indented and bulleted or numbered. If this behavior isn't actually all that helpful for you, and you'd rather control your own list-making without Word's help, you can turn to your autocorrect options.
4. Add or remove watermarks on document pages.
Watermarks on Word documents can be useful for indicating the status of the doc, or perhaps where it came from. But if you've ever been responsible for preparing a document for final production and couldn't figure out how to remove that faded "DRAFT" text on every page, you might be a little frustrated with watermarks! It's actually an easy process to add or remove watermarks, and there are more customization options than you might've realized.
5. Change the authors of a Word 2013 document.
Microsoft Office 2013 sets the document title based on the user account where the document originated. If you need to change or remove the author attribute from a document, the settings can be accessed from the File tab, in the lower right quadrant of the Info screen. You'll be able to remove existing authors, and add a new author or authors.a Word 2013 document.
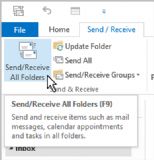
What to Do if Your Outlook Emails Get Stuck in the Outbox or Send Slowly
A common complaint of Outlook users is that their email send process takes too long, "hangs," or traps messages in the outbox. Has that ever happened to you? We collected some troubleshooting instructions that should help you get your messages traveling smoothly again. These steps apply to Outlook 2013 and Outlook 2016.
First step: try re-sending
Go to the Send/Receive tab and click Send All. You'll see a dialog box showing the results of the process, and your email might exit the outbox. If that doesn't work, move on to the following steps.
1. Make sure Outlook is online.
In your status bar at the bottom of your Outlook message, you'll see a status of "Disconnected" or "Trying to Connect" that could explain why your messages aren't sending. If your mail is hosted on an on-premise Exchange server, it's possible that the local server is down-you may want to check with your admin. If you use Office 365, check your internet connection, wait a few minutes to make sure it's not a momentary O365 outage, and try again.
2. Check your mail settings.
Are you sure your mail is supposed to send immediately? If you've set a rule to delay message sending, you will see your mail in the outbox for awhile.
3. Is your message being slowed down by a large attachment?
Depending on the speed of your internet service provider, if you've attached a large file to your email message, you may see it sitting in the outbox because it's simply taking awhile to send, and it may be blocking all subsequent emails from sending. (You can counteract this by using OneDrive for Business to collaborate on large files instead.)
4. Use the correct password.
If you recently changed your password, you'll have to make sure Outlook "knows" the correct password. From the File tab, select Account Settings and Account Settings again. Select your account and click Change. Under Logon Information, in the Password box, type your new password.
5. Re-send directly from the outbox.
If your Outlook settings are configured a certain way, you won't be able to send emails if you've opened or clicked on them after you've clicked send, i.e. if you've marked them as read from the outbox. If this is the case for you, open your email from the outbox, browse to a new folder so you won't automatically re-mark it as read, and click Send on the stuck email.
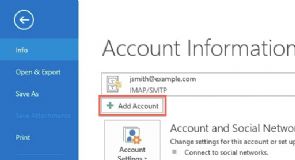
How to Add an Additional Email Account to Outlook
If you manage multiple email accounts-and who doesn't these days?-you can add them all to your Outlook 2013/2016 client. Whether it's another Office 365 for Business account, a personal Gmail account, or something else, these steps will allow you to add that additional account to Outlook so you can see all your mailboxes alongside each other.
- From the File tab, select + Add Account or Account Settings -> Account Settings.
- Enter your information in the Add Account dialog box: full name, complete email address, and password you use for that account. Click Next.
- Your account will automatically be configured. Click Finish.
- You'll be notified when the configuration is complete. Click OK. Restart Outlook to see it alongside your other mailboxes.

Printing Formatted Comments
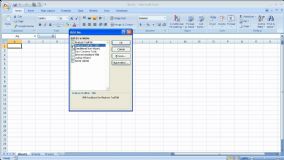
Excel provides a way to make sure that the comments print out in a formatted manner, but that way isn't immediately obvious. Follow these steps:
1. Display the Page Layout tab of the ribbon.
2. Click the small icon at the lower-right corner of the Page Setup group. Excel displays the Page Setup dialog box.
3. Make sure the Sheet tab is selected. (See Figure 1.)
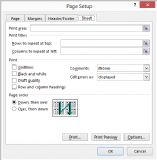 Figure 1. The Sheet tab of the Page Setup dialog box.
4. Using the Comments drop-down list, choose As Displayed On Sheet.
5. Click OK.
6. Print as you normally would.
It should be noted that Excel only prints those comments that are visible on the sheet when the printing occurs. The best thing to do is to make sure that you make your comments visible before actually printing.
Copying Paragraph Formatting with the Mouse
Often it is beneficial to copy paragraph formatting from one place in your document to another. Word provides a quick way you can do this by using the mouse:
1. Select the paragraph whose formatting you want to copy.
2. On the Home tab of the ribbon click on the Format Painter tool. (It is in the Clipboard group.)
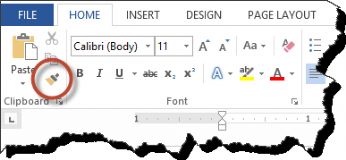
3. Using the mouse, select the paragraph you want formatted.
You can also copy the same format repeatedly by double clicking the Format Painter tool in step 2. You will then be able to apply the same formatting until you turn off format painting by clicking on the tool one more time or by pressing Esc.
Undo Send in Outlook 2013 With This Setting
It happens: you send a personal message to the wrong recipient, you realize too late that you made a horrible typo in an email to an executive, you clicked Reply All when you really meant to Reply.
If you're lucky, the conditions will be right to recall the message using Outlook. But it's possible-even likely-that you won't be able to recall the message before it's seen by the recipient.
You're most likely to realize your mistake within the first few moments after sending. Prevent these "oops!" moments by creating a rule to delay your outbound messages by one or two (or more) minutes. That way, you can modify or delete your outgoing email and correct the mistake.
Follow the instructions listed below:
- Click the File tab.
- Select Manage Rules and Alerts.
- Click New Rule.
- Under Start from a Blank Rule, click Apply rule on messages I send. Click Next.
- Skip the screen for selecting conditions, and click Next. Click Yes in the dialog box that appears to apply the new rule to messages you send.
- Select defer delivery by a number of minutes.
- In the box below, click the phrase number of and enter your desired delay. (We recommend 1-5 minutes.)
- Click OK.
- Click Next.
- Enter a name for the rule, and keep the Turn on this rule box checked.
- Click Finish.
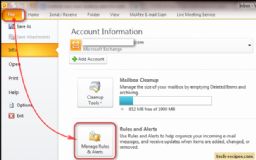
Bear in mind that this is a "client-only" rule. Rather than being applied at the Exchange Server level, this rule is applied to the Outlook 2013 client while it is running only. So if you send messages from the web, a mobile device, or anywhere other than Outlook 2013, the rule will not be applied.
How to Use Sweep to Clean Up Your Office 365 Inbox
The Sweep feature was recently introduced to Outlook on the Web (formerly known as Outlook Web App) along with a wave of updates that enhanced Outlook for Office 365. It's hard to miss in the new UI, but some Outlook users may overlook its power. In fact, Sweep can help you manage your inbox with a simple set of actions.
What Sweep can do
When you select a message and click the Sweep icon, you'll see four options based on the sender of that email.
- Delete all messages from the Inbox folder (from that sender)
- Delete all messages from the Inbox folder and any future messages (from that sender)
- Always keep the latest message (from that sender) and delete the rest
- Always delete messages (from that sender) older than 10 days
It's up to you how and when to institute these rules, but one great use is for the ubiquitous coupon and sale emails that many of us get. Perhaps you do want to stay informed about deals at your favorite store, but after 10 days, many of those emails become outdated. You could choose the final option, Always delete messages older than 10 days, and you no longer have to take any action on those outdated emails-Sweep takes care of it for you.
Once you institute a Sweep rule, you'll be able to see it by clicking on View rules in the sweep dialog box, or go to Options -> Mail -> Inbox and sweep rules.
Creating a New Document in VBA
One of the common things done during a macro is to create a new document. For instance, your macro could need the new document to hold processed text, or a different version of the document on which you are working.
To create a new document, simply include this line in your VBA macro:
Documents.Add
This creates a new document, based on Normal.Dot, adds it to the Documents collection, and makes the document active. This is the same as clicking the New button on the toolbar. If you want to create a new document based on a different template, simply use this command:
Documents.Add("MyTemplate.dot")
Take Control of Sections
Sections control the flow of your document. All Word documents start with a single section. That changes when you do one of the following things:
Insert a section break. You can create a new section manually by inserting a section break (Page Layout menu > Breaks). There are two basic types of section breaks. A continuous break starts a new section without starting a new page. A next page break starts a new section on a new page. You'll also see two other section breaks available: odd page and even page. Those are really just next page breaks that force the new page to start with that page numbering.
Change page formatting on specific pages. Remember, Word doesn't really see pages-only sections. When you change formatting on a particular page or range of pages, Word creates a new section for those pages by automatically inserting section breaks on either side of them. Any page-level formatting you apply is really applied to that section.
Sections can definitely be one of the more frustrating aspects of working with Word, especially since you have to click over to Draft view just to see and work with them.
Applying Bullets from the Keyboard
Word includes a handy-dandy tool (available on the Home tab of the ribbon, in the Paragraph group) that allows you to add bullets to a paragraph in a jiffy and just as easily remove them. Unfortunately, there is no just-as-easy way to do the same thing using the keyboard.
If you are bound and determined to use the keyboard to apply (and remove) bullets, there are a couple of things you can look at. The first is to use styles and define keystrokes that apply your styles.
Closely related to this approach are two built-in shortcuts provided by Word. If you press Ctrl+Shift+L, Word is supposed to automatically apply the predefined List Bullet style to your paragraph. To remove bullets, you could also use the Ctrl+Shift+N shortcut, which applies the Normal style.
While these may work for what you want done, they don't take the same approach to formatting as the Bullets tool on the Home tab of the ribbon. If you want to have that same functionality from the keyboard, you must customize your keyboard. Follow these steps:
1. Display the Word Options dialog box. (In Word 2007 click the Office button and then click Word Options. In Word 2010 and Word 2013 display the File tab of the ribbon and then click Options.)
2. At the left side of the dialog box click Customize (Word 2007) or Customize Ribbon (later versions of Word).
3. Click the Customize button, near the bottom-left of the dialog box. Word displays the Customize Keyboard dialog box.
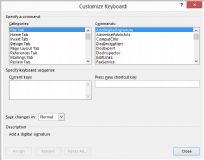
4. In the Categories list, choose All Commands.
5. In the Commands list, choose FormatBulletDefault. (You'll need to scroll down quite a ways.)
6. Click in the Press New Shortcut Key box.
7. Press the keystroke you want to use to apply bullets. Alt+B is a good choice, since it is not in use on a default Word system.
8. Click on Assign.
9. Click on Close to dismiss the Customize Keyboard dialog box.
10. Click on Cancel to close the Word Options dialog box.
Now, whenever you press the keystroke you chose in step 4, it is the same as clicking on the Bullets tool. Press the keystroke again, and the bullets are gone. (Of course, you can also press Ctrl+Q to remove the bullets by returning to the default paragraph formatting.)
How to Create Beautiful PowerPoint Slides (Even if You're Not a Designer)
Have you seen Death by PowerPoint? This slideshow is, by now, almost eight years old, but a lot of the principles hold true. Still, it can be challenging and intimidating to create a PowerPoint presentation that is informative, effective, and attractive. But you don't need to be a graphic designer to create beautiful PowerPoint slides as long as you keep in mind a few key tips.
Here are our recommendations:
- Keep your PowerPoint slides as simple as possible.
We've all seen slides that are too overloaded with words. Try to avoid this not-so-great practice by using the bare minimum amount of words on your slide-you don't even need to use complete sentences.
It's up to the presenter to convey meaning to his or her audience; the slide should be more of a supportive prop. If your slides have the word-for-word information that the presenter will say, you might as well hand out paper copies or simply send out an email rather than creating a presentation.
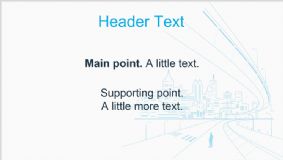
Balancing a minimal number of words with strong visuals will keep your audience captivated. Which brings us to our next point...
- Learn how to use SmartArt and align shapes.
PowerPoint 2013 has many functions that can help you make your slides look good. One option is SmartArt graphics, which are great for conveying concrete or quantifiable data. Remember, you can customize your graphics; change the color or shape style to fit a brand guide or simply make your shapes look more consistent with the style of the rest of your presentation.
When you add shapes or text boxes to your PowerPoint slides, they can look messy if they're out of alignment or inconsistent in size. Luckily, PowerPoint actually has built-in controls that snap shapes into just the right spot. You can also manually align your shapes into specific regions of the slide.
- Get outside help (in the form of templates, fonts, and images).
While PowerPoint 2013 has a lot to offer, you shouldn't be restrained by its stock fonts and templates. And of course, images go far to make a slide more attractive. We recommend looking outside of PowerPoint to see what can take your presentation to the next level.
- Fonts for PowerPoint presentations
Standard fonts are fine for presentations, but don't necessarily stick with the default Calibri. On the other hand, if you use a unique font just to make things more interesting, you run the risk of making your presentation look unprofessional. Varying the size and weight of the same font can add visual interest to a slide without risking the unprofessional look.
If you want a font that doesn't come installed with Office by default, check out sites like Font Squirrel. There are even many resources online for pairing different fonts together. Research a little, and you just might find you become a typography fan!
- Images for PowerPoint presentations
Creating visual interest with photographs or other images can give your presentation more pizzazz. Try to avoid cliches, though-every image should support the point on the slide, not just be thrown on as an afterthought.
You can use free stock images or buy them at sites like Shutterstock and freeimages.
- Templates for PowerPoint presentations
Try a template for a little extra guidance. Many organizations have branded, required templates that you may be required to use, but if you have a little flexibility, you can find a template on your own. Office provides some PowerPoint templates, or you can search for free templates online.
- A final note on PowerPoint slide design:
If nothing else, remember to keep it simple. Presenting too much information is probably the most common problem with PowerPoint slides.
How to Change the Background of a PowerPoint Slide
When you're working with PowerPoint slides or an overall theme, there's a good chance you will want to change the background from the standard white to something more customized. It's a great way to add visual interest to your PowerPoint presentation.
Backgrounds come in a few styles: solid, gradient, picture or texture, and pattern.
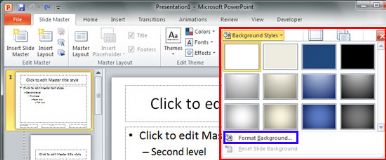
To change the background of a slide or slides, follow the instructions in the video above, or:
1. Go to the DESIGN tab.
2. Click the Format Background button.
3. In the Format Background Pane that appears, select the type of fill for your slide background. It will immediately apply to the slide (no need to click an option like "apply.")
4. Depending on your choice, modify the additional options. For example, if you choose a gradient fill, you can modify the type, direction, angle, gradient stops, transparency, and so on.
5. Select Reset Background if you'd like to remove the background formatting. Select Apply to All if you want to apply your choices to all slides in the presentation.
Copy and Paste Visible Cells Only
Have you ever wanted to only copy or paste visible cells?
For example, below I have a table containing outstanding customer invoices. I want to insert a formula in column E to insert an overdue fee for invoices outstanding longer than 31 days:
However, I don't want the formula on the subtotal rows (row 5, 11, 13, 19, 21 etc.)
I can use the Group buttons to quickly hide the subtotal rows. I've entered my formula in cell E2 and I just need to copy it down:
Note: I know I could have used filters to hide the Subtotal rows, but for whatever reason I don't want to, so let's go with it.
Paste Visible Cells Only
The problem with a regular copy and paste is Excel will also paste to the hidden cells, so I have to select the visible cells first. I can do this with Go To Special:
- Copy cell E2 to the clipboard - just select it and press CTRL+C
- Select the range you want to paste to. In my case E3:E51
- Press CTRL+G to open the Go To dialog box and then click 'Special' in the bottom left:
- In the Go To Special dialog box select the 'Visible cells only' button and click OK.
Notice how each group of cells are individually selected:
- You can go ahead and press CTRL+V to paste the formula into the visible cells. I've unhidden the subtotal rows in the image below so you can see the magic:
Tip: Instead of copying and pasting, I could enter the same formula in all the selected visible cells using steps 2 to 4 above, then for step 5: type in the formula and press CTRL+ENTER to enter them all in one go.
Copy Visible Cells Only
Copying cells in a filtered table will only copy the visible cells by default, but if you have hidden rows or columns (as opposed to filtered), then Excel will copy the hidden ones too.
For example, you can see in the data below that row 3 is hidden:
We can use the same technique to only copy visible cells:
- Select the range A2:E9
- CTRL+G to open the Go To dialog box
- Click 'Special'
- Select 'Visible cells only'
You can see there is a subtle line between rows 2 and 4 indicating row 3 is not selected:
- Press CTRL+C to copy and then go ahead and paste the cells where you want. You'll notice they are pasted as a contiguous range of the 7 copied rows.
Copying Subtotals
Excel has a handy feature that allows you to automatically add subtotals to a data list. You may be wondering, once the subtotals are in place, how you can copy the subtotals to a different worksheet. This is actually rather easy to do, if you follow these steps:
1. Add your worksheet subtotals as you normally would.
2. Collapse the information in the list so that only the subtotals are showing. (Click on the small 2 in the outline levels shown at the top of the gray area at the left of the worksheet.)
3. Select the range of cells containing the subtotals you want to copy. (Do not select complete rows or columns; just select the range of cells.)
4. Press F5. Excel displays the Go To dialog box.
5. Click on Special. Excel displays the Go To Special dialog box (see picture).
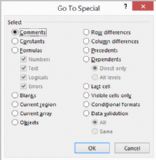
6. Make sure the Visible Cells Only option is selected.
7. Click on OK. Excel selects just the visible information from the range you specified in step 3.
8. Press Ctrl+C to copy the rows to the Clipboard.
9. Select the cell where you want to paste the subtotals.
10. Press Ctrl+V to paste the information.
Problems with Custom Views
Custom views can be a great help in presenting data in a workbook. If you are using custom views, you may be surprised at some point by an error message that says "Some view settings could not be applied."
Don't despair if you see this message; it simply means that protection has been applied to one or more of the worksheets involved in the custom view. With protection enabled, any view settings that would violate the protection settings will not be applied and the message is displayed.
The solution is to either modify the view so it doesn't use any of the protected worksheets, or remove the protection from the worksheets used in the view.
Changing Gridline Color
The gridlines help you track information on the screen easier and to locate cells quickly. Normally the gridlines are shown in black, but you may want to make them some other stylish color. If you want to change the gridline color, follow these steps:
1. Display the Excel Options dialog box. (In Excel 2007 click the Office button and then click Excel Options. In Excel 2010 and Excel 2013 display the File tab of the ribbon and then click Options.)
2. At the left of the dialog box click Advanced.
3. Scroll through the options until you see the Show Gridlines check box; select it. (It is in the Display Options for this Worksheet section.
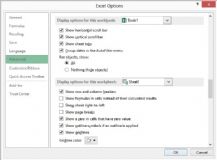
4. Click the Gridline Color control and choose a color you want to use for the gridlines.
5. Make sure the Show Gridlines check box is selected.
6. Click on OK.
You can specify different gridline colors for each worksheet in a workbook.
Adding a Little Animation to Excel
Anyone who says that Excel is boring obviously doesn't know that you can add animation to your workbooks. You can spice up your life by turning on animation for the feedback you receive from Excel. For instance, instead of seeing a new column immediately appear when you add it, with animation turned on the column will appear to "slide" into position, slyly moving existing columns to the right.
If you want to turn on feedback animation in your system, follow these steps if you are using Excel 2007 or 2010:
- Display the Excel Options dialog box. (In Excel 2007 click the Office button and then click Excel Options. In Excel 2010 display the File tab of the ribbon and then click Options.)
- At the left side of the dialog box click Advanced.
- Scroll through the available options until you see the General section.
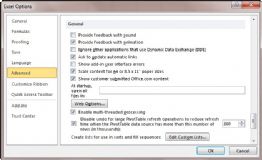
- Make sure the Provide Feedback with Animation check box is selected.
- Click on OK.
This option is available only in Excel 2007 and Excel 2010. It was removed entirely from Excel 2013.
Add, Reply To, And Complete Comments In Word 2013
Comments and revisions got a makeover with Word 2013, with a much more streamlined look and feel and improved functionality. A key collaboration and communication component of Word, comments now include long-requested functions like replying and marking as complete.
The video above provides the steps to add and reply to comments in Word 2013, as well as mark them as complete. You can also follow the steps below.
To Add A Comment:
1. Select the relevant text you are commenting on-sentence, paragraph, etc.
2. From the REVIEW tab, click New Comment.

3. A comment bubble with your name will appear. Type your comment in the field.
4. Click away or press Escape to complete the comment.

If you need to add to or edit your comment, simply click on the text and continue typing in the text field.
To Reply To A Comment:
1. Hover over the comment you wish to reply to.
2. Click the reply icon in the upper right corner of the comment box.
3. A reply field will appear with your name attached.
4. Type your reply in the field.
5. Click away or press Escape to complete the reply.
To Mark A Comment As Complete:
1. Right-click on the comment
2. Select Mark Comment Done.
Automatically Loading Add-ins
There is a way to selectively load add-ins for specific worksheets, but it involves the use of macros attached to the Workbook module for the specific worksheets. Follow these general steps:
- Load the worksheet for which you want a specific add-in loaded.
- Press Alt+F11 to display the VBA Editor.
- Double-click on the "This Workbook" object in the Project Explorer. Excel opens a code window for This Workbook.
- Place the following macros in the code window:
Private Sub Workbook_BeforeClose(Cancel As Boolean)
AddIns("Add-In Name").Installed = False
End Sub
Private Sub Workbook_Open()
AddIns("Add-In Name").Installed = True
End Sub
- In the code, change the name of the add-in ("Add-In Name") to the real name of the add-in you want to use with the workbook.
- Close the VBA Editor.
- Save your workbook.
How to Create a Survey Using Excel
You can use Excel Online to create a survey with a shareable link that saves responses in a back-end spreadsheet, allowing you to analyze your data however you wish.
To create your survey:
- Click the new button and choose Excel survey.
- Enter a survey title. This is for internal use, and will store the responses, so name it however you prefer.
- In the Edit Survey window that appears, enter a title and description for the survey.
- Click into the Enter your first question here field.
- Enter a survey Question, and an optional subtitle.
- Choose a Response Type:
- Text: for short written responses
- Paragraph text: for longer written responses
- Number: for numerical responses
- Date: for answers you can sort by date
- Time: for answers you can sort by time
- Yes/No: for yes or no responses
- Choice: for a drop-down menu the survey taker can choose from
- Check the strong>Requiredbox if the question is not optional.
- Enter a Default Answer that will be pre-filled for the survey taker.
- Click Done.
- To add more questions, click + Add New Question and repeat steps 5-10.
- Once you've completed adding questions, click Save and View.
- Review your survey, and click Share Survey to get your sharing link.
You also may choose to view and test your survey, using the sharing link, before you distribute it to others. This will help verify that the survey is working correctly and the questions will collect the type of answers you need.
When others take your survey, their responses will be stored in your Excel Online spreadsheet. You can do whatever you want with the data, and it's a good practice to consider your end goals before you create the survey, as it may affect how you write and structure the questions.

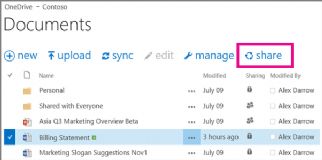
Share Your Outlook Calendar With People Within Your Organisation
1. From your calendar, select the SHARE button.
.png)
2. Enter the name(s) or email address(es) of the person or persons you want to share your calendar with.
3. From the drop-down menu that appears, choose how much information you want to share. According to Microsoft, full details show the time, subject, location, and other details of all items in your calendar. Limited details show the time, subject, and location, but no other information. Availability only shows the time of items on your calendar and no other details. An editor can edit your calendar. A delegate can edit your calendar, and can send and respond to meeting requests on your behalf. For more information about editor and delegate access, see Calendar Delegation in Outlook Web App.
4. Optionally, edit the subject line of the invitation.
5. If enabled and necessary, select which calendar you want to share. (Note that if you share a calendar other than your primary calendar, you can give permission only for full details or editor access.)
6. Click Send.
Each recipient will receive an invitation with an option to add your calendar and share their calendar back. It also will include a URL that can be used to access the calendar. If they add your calendar, it will be displayed under People's calendars on their calendar page.
Entering Dates in Excel
Dates are a special case in Excel. If you enter information that can be translated as a date (by any stretch of the imagination), then Excel treats it as a date. It converts your data into a serial number that is internally used to represent dates and times. For instance, any of the following entries will be translated to a date by Excel:
- 12/15
- 12-15/12
- 15 Dec
- December 15, 2012
If you enter the first example, Excel will convert it to a date and display that date as best it can determine. If you leave off the year in your entry, Excel assumes you mean the current year. You could also use dashes instead of slashes and Excel will still figure out you are entering a date.
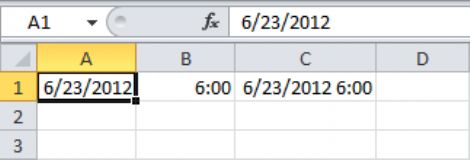
Regardless of how you type a date, it is converted to a special serial number by Excel and stored internally in that format. How you see the date on your screen is a consequence of how the cell is formatted. Even though Excel stores dates in a standard format internally, they can be displayed using any number of different formats.
Adding Text Boxes to Charts
When you create a chart from your Excel data, you may want to add text boxes to the chart for any number of purposes (copyright statement, explanation, notes, etc.). There are two quick ways you can add a text box.
The first method is to use the Drawing toolbar or, if you are using Excel 2007, the Insert tab of the ribbon. Simply make sure it is displayed, then click the Text Box tool. The mouse pointer changes to crosshairs, and you can click and drag to outline the text box you want created.
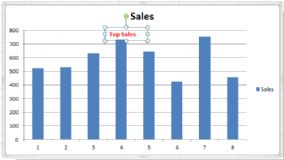
The second way to create a text box is to use the Formula bar. Make sure you select any part of your chart except a title or data label. Click in the Formula bar and start typing what you want to appear in the text box. When you press Enter, the text you typed is placed in a text box in the center of the chart. You can then move and resize the text box, as desired.
Excel Tip - Fixing Odd Sorting Behaviour in Excel
Sometimes when you try and sort data in Excel, it does not sort in the order that you expect. Excel interprets the information in each cell. When you enter information in a cell, Excel tries to determine if it is a number, a date, or text.
It just so happens that Excel is "guessing wrong" when it comes to some data.
When you enter 311, Excel considers that to be a number, so it treats it as a number. Similarly, if you enter the text "True," Excel considers that a Boolean value- which is a number.
When performing a sort, Excel first sorts by the data type and then within the data type:
- 112 and 702 are numbers
- 3 of Hearts and 38 Special are text because they don't consist of only digits.
When sorting by the column, the 311 shows up in two different places because the group name was parsed by Excel in some instances as a number and in other instances as text.
To understand how to correct the odd behaviour, it is important to understand that the behaviour isn't really odd; it is the logic Excel uses.
First, if you sort in ascending order, the values in your cells will be sorted in these data types:
- Numbers in increasing value (1, 2, 3, etc.)
- Text in alphabetic order (a, b, c, etc.). If the text begins with a number (as in 38 Special), then the 3, as text, appears before the ABCs.
- Logical values (False, True)
- Error values (#DIV/0!, #N/A, etc.)
- Blanks
You can better see the data types that Excel assigns to various cells by removing any explicit alignment in the cells - by default the text values are left-justified, numbers right-justified, and Boolean and error values centered.
To get things to sort the way you want, you just need to make sure that all the cells in a column contain the same type of data - In the cells being sorted as numbers (like 311), edit the cell to place an apostrophe before the first digit in the number. This tells Excel you want the cell's value treated as text. You can also do the same thing with "True."
Excel Tip - Calculating Fractions of Years
One of the types of data that Excel allows you to store is, of course, dates. At some point you may wish to perform some calculations with the dates in your worksheet. It is not uncommon to need to figure out the percentage of a year represented by the difference between two dates.
Excel allows you to calculate this easily using the YEARFRAC worksheet function.
To use the function, all you need to do is provide two dates and a value that specifies how Excel should calculate the fractional year:
=YEARFRAC(DateOne, DateTwo, Basis)
- The dates used by YEARFRAC can be either static dates, or they can be references to cells that contain dates.
- The Basis value ranges between 0 and 4, with 0 being the default. The following are the different meanings for the Basis:
Basis Meaning
0 US 30/360
1 Actual/actual
2 Actual/360
3 Actual/365
4 European 30/360
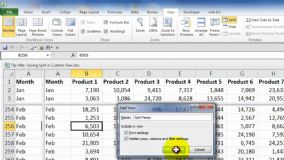
Excel Tip - Formatting PivotTables
Maintaining Formatting when Refreshing PivotTables
PivotTables provide a great way to analyze large amounts of data and pull out the summarizations that you need. Once you have the PivotTable displaying the values you need, you can then format the table to make the data presentable-for a while. You see, when you update the data on which the PivotTable is based, and then refresh the PivotTable, all your formatting work may go away.
The way around this is to follow these steps:
1) Make sure that your PivotTable displays the values you want.
2) Format the PivotTable in whatever way desired.
3) Select a cell in the PivotTable.
4) Display the Options tab of the ribbon.
5) Click the Options tool in the PivotTable group. Excel displays the PivotTable Options dialog box.
6) Make sure the Layout & Format tab is displayed.
7) Make sure the Preserve Cell Formatting On Update check box is selected.
8) Click OK.
Now, when you refresh the PivotTable, your previously applied formatting should remain on rows and columns previously in the PivotTable. If the refresh results in new rows being added to the PivotTable, then you will still need to format those, unless you are using an AutoFormat.
Excel Tip - Converting a Reference to a Hyperlink Into a Hyperlink
If you have a hyperlink in a cell (such as cell A1) and then you use a formula in another cell that references that hyperlink, the result of that formula is not a hyperlink. For instance, suppose cell B1 contains this simple formula: =A1
The result of that formula will not be a hyperlink, even if cell A1 contains a hyperlink. The reason is that the formula extracts the value of the referenced cell, which is the text displayed in A1.
If what is displayed in cell A1 is a URL, then you could modify your formula just a bit to result in a hyperlink: =HYPERLINK(A1)
If cell A1 does not contain a URL, or if it is a hyperlink where the displayed text is different then the underlying URL, then the HYPERLINK function won't work as expected.
Excel Tip - Changing Chart Size
There are two types of charts that you can create in Excel-embedded charts and chart sheets. A chart sheet occupies an entire page. An embedded chart appears on the same page as your worksheet data.
If you are working with an embedded chart, you can change the size of the chart to any size you want. You cannot directly change the size of a chart sheet; it is set to be a single page. You can modify the printed size of a chart sheet, however.
You change the size of an embedded chart as you would any other graphical object in Excel:
- Click once on the chart. Handles appear around the chart border. As you move the mouse pointer over these handles, they change to sizing arrows.
- Click and hold the left mouse button and drag a sizing handle until the graphic is the size you want. The arrow heads on the mouse pointer indicate the direction which you can move the border.
- Release the mouse button. The chart is resized and reformatted.
-
14/4/2025
New Course - Microsoft Power BI Introduction training from Belfast Northern Ireland - Classroom & Online Training -
31/3/2025
Microsoft 365 training courses in Word, Excel, Access, Outlook, Powerpoint, Sharepoint in Belfast and Omagh Northern Ireland -
3/3/2025
Microsoft 365 Training Courses now available inc Belfast, Omagh, Derry, Newry and Throughout Northern Ireland -
17/4/2025
HOT COURSE - Introduction to Microsoft Excel Training in Belfast Northern Ireland OR On your Own Premises - Call NOW to Book -
3/3/2025
Need to Produce and Deliver Professional Presentations? Book NOW on our Advanced Microsoft PowerPoint course Training in Belfast Northern Ireland OR On your Own Premises - Limited places available -
6/5/2025
Intro to Crystal Reports Training from Belfast Northern Ireland - Virtual, Online - Learn how to create powerful and dynamic reports, presenting your data in an attractive format -
3/3/2025
Power BI Paginated Report Builder -
14/4/2025
CLASSROOM & ONLINE Power BI Level 1 course -
3/3/2025
Hot Course - 2 Day Advanced Microsoft Excel Course Training - CALL NOW TO BOOK -
20/3/2025
1 day Adv Microsoft Excel CourseTraining in Belfast Northern Ireland OR On your Own Premises - Places Available - Call Now to Book -
3/3/2025
Data Visualisation & Presentation Techniques with Mullan IT Training -
26/3/2025
Microsoft Sharepoint Introduction Training Course in Belfast NI -
3/3/2025
CITB - The Construction Industry Training Board have included Mullan Training on their Approved List We deliver Trainings in Belfast Northern Ireland OR On Customer's Own Premises -
3/3/2025
IT/Computer Room Hire in Belfast City Centre (Opposite Europa Hotel) - Call now to book -
3/3/2025
HOT COURSE - Intro to Microsoft Visio Training in Belfast Northern Ireland OR Virtually - CALL NOW to secure a place on this course -
30/4/2025
Microsoft Visio Training from Belfast Northern Ireland - Maximise the potential of the Visio application -
3/3/2025
Intro to Microsoft PowerPoint Training from Belfast Northern Ireland - Online Training Course -
25/3/2025
Introduction to Microsoft Project Training from Belfast Northern Ireland - Classroom Based Training & Via Our Online Classrooms